Translate
The Kent County E-File system provides parties the ability to efficiently file electronic documents with the 17th Circuit Court 24 hours a day, any day of the week. We highly recommend preparing your documents before starting in order to make your filing experience easier.
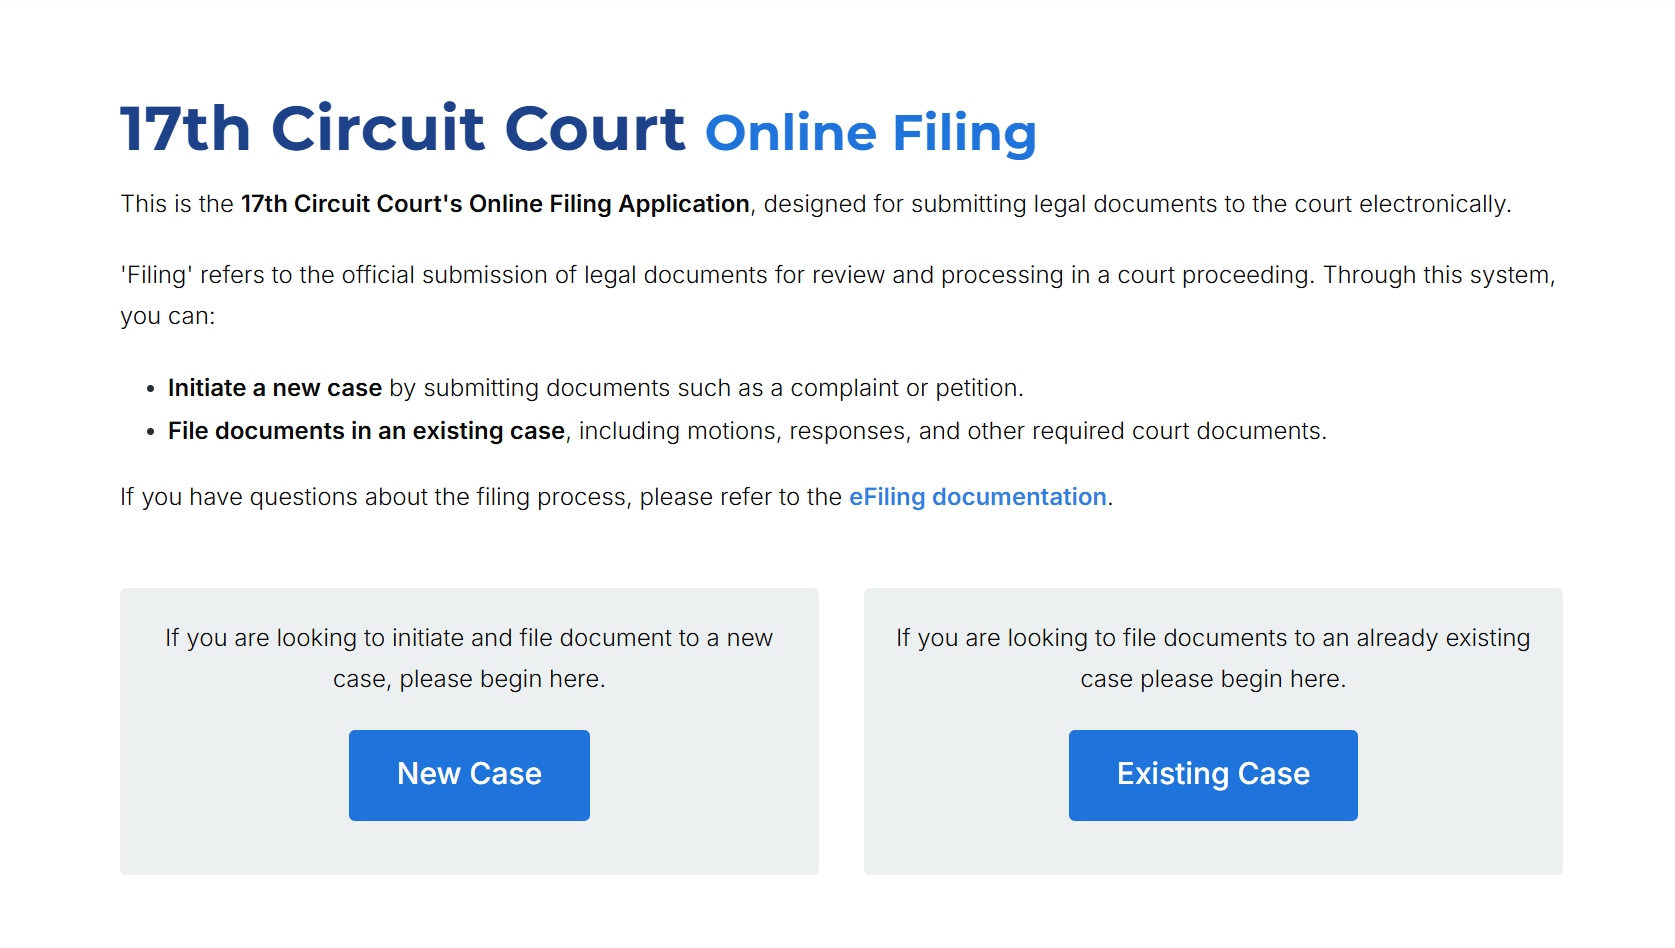
When first accessing the e-filing system, you will be presented with two options: File on an existing case, or file on a new case. Case numbers are required in order to search for existing cases. If you do not know your case number, an online court name search can be completed.
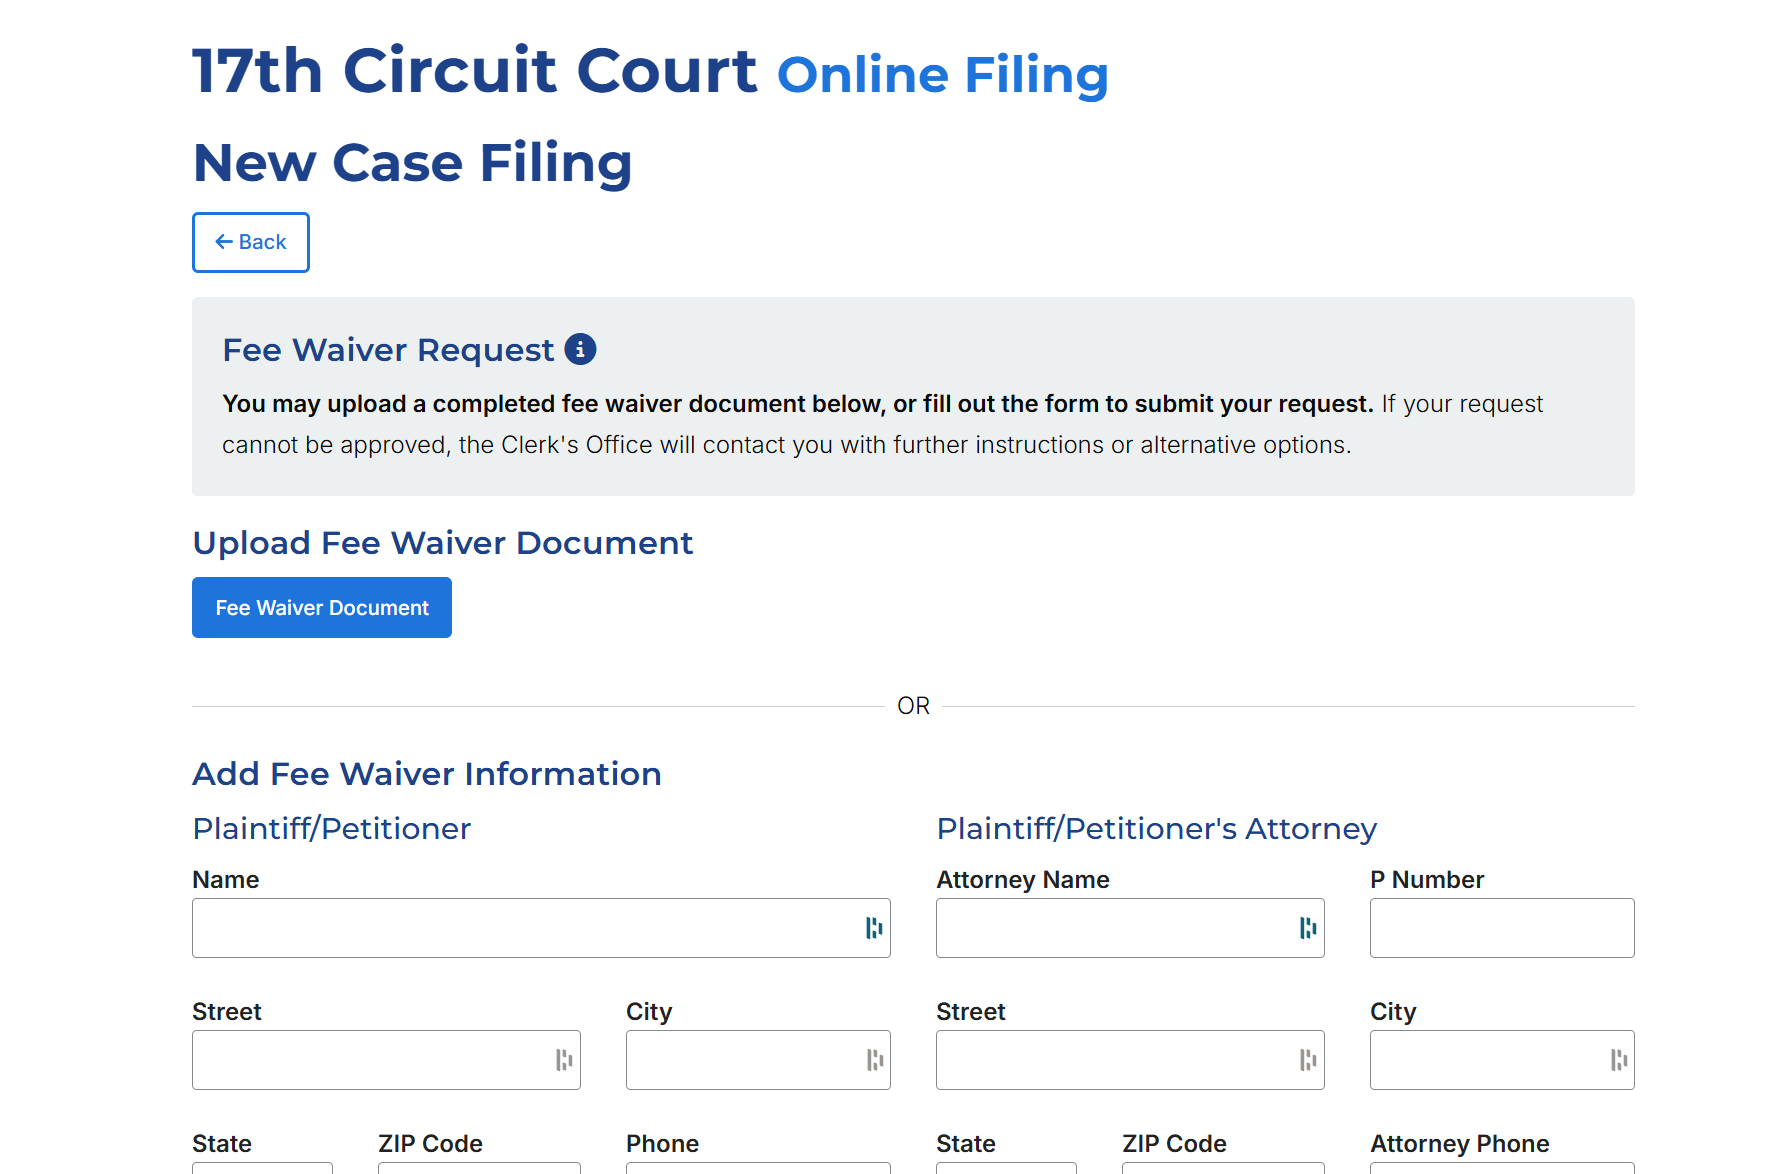
A "Fee Waiver" in court filings is a request made to the court to excuse a person from paying the standard filing fees associated with initiating a legal case, typically because they cannot afford to pay them due to financial hardship. Essentially, it allows someone to file a lawsuit without paying the usual court fees if they demonstrate their inability to do so. You must complete the Fee Waiver form in order to qualify.
After completing a fee waiver, you will initially not be required to pay on your filing. A judge will review your fee waiver request and will determine if you qualify. If approved the fee will be waived and no further action is needed. If denied you will be contacted and a payment will be requested to complete your filing.
For a full list of case types and their definitions, please refer to this Circuit Court Case-Type code list.
When preparing forms for e-filing in the 17th Circuit Court, it's essential to adhere to specific guidelines to ensure your documents are accepted and processed efficiently. Here are some best practices.
When filing a new case, you will be prompted to choose a filing year and case type. A quick guide of case types can be found here.
Once your case has been accepted and processed, you will be assigned a case number. Until the case has been approved, your filing will have no case number.

If representing yourself on a case, you will be prompted to enter in your contact information. You are the person who will be notified regarding your filings.
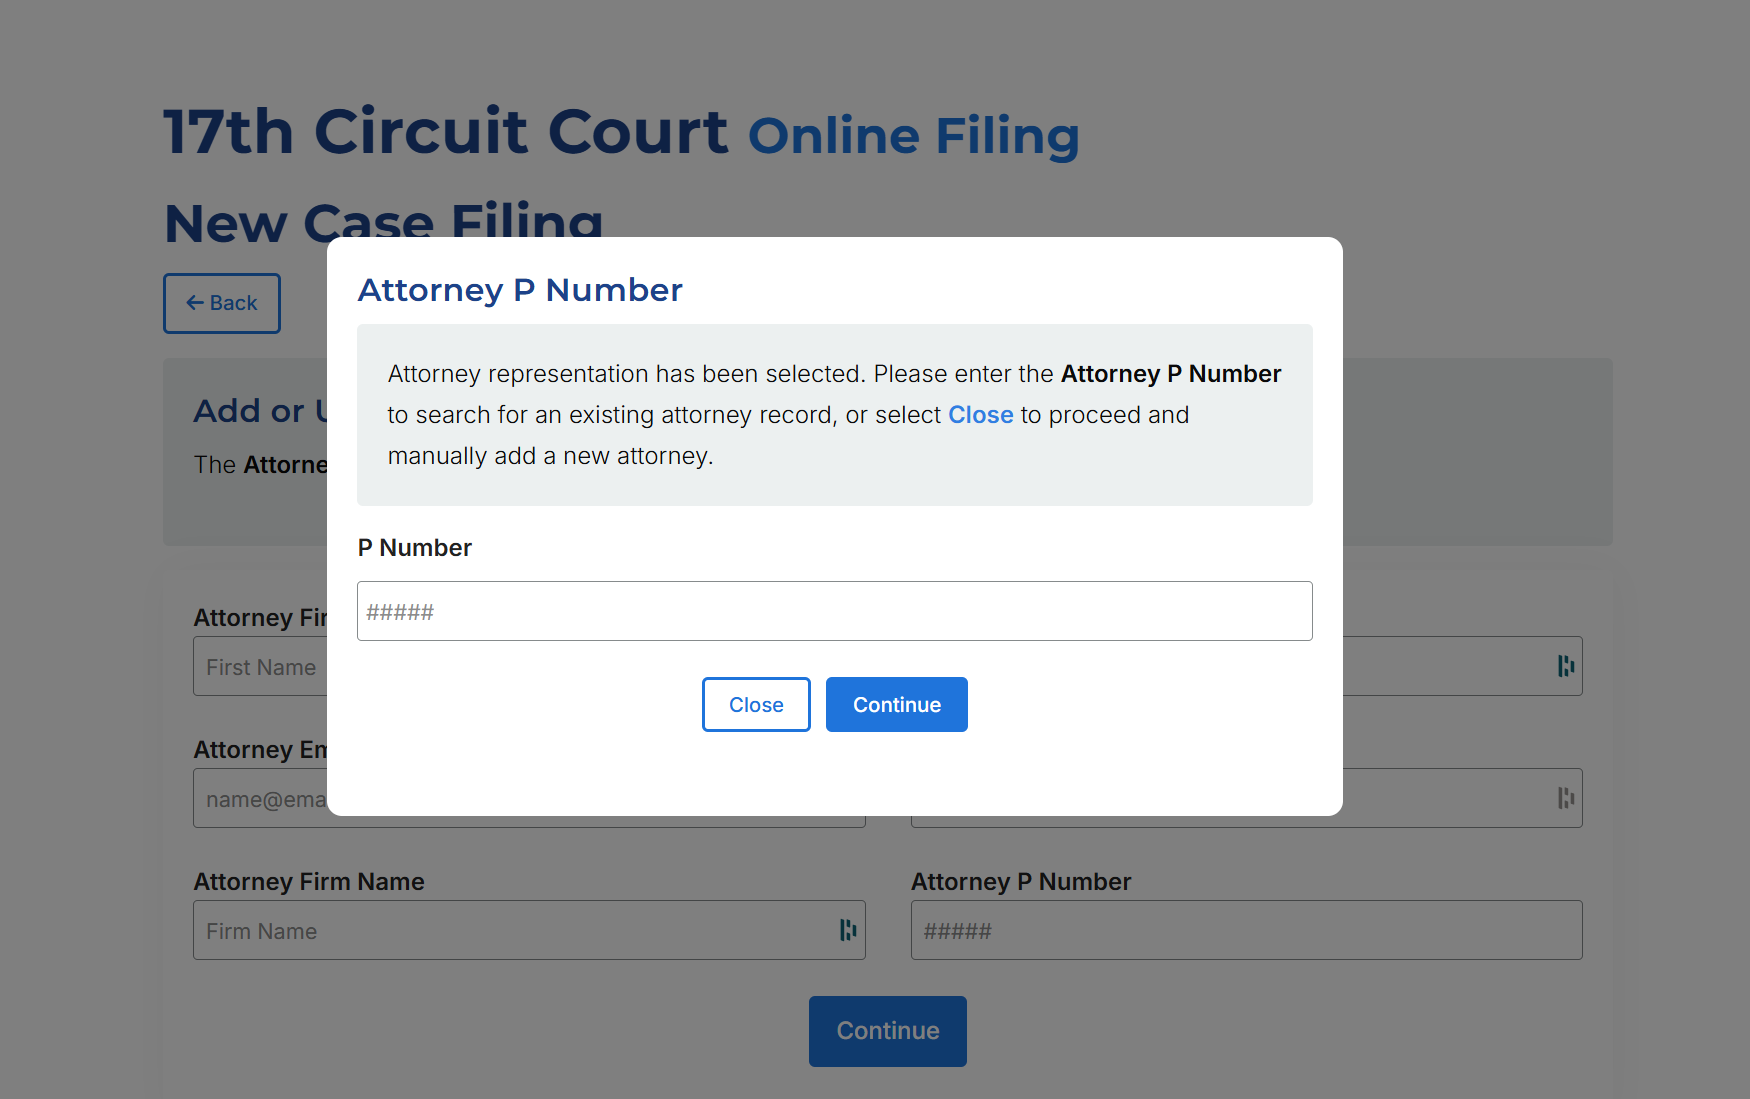
If an you are an attorney filing on behalf of your client or clients, you can search for yourself in the system using your P Number. If you have filed through the 17th Circuit Court's E-Filing system before, your information will automatically populate. If you have not filed before, you will be prompted to enter your information.
The "Select if you are the attorney making this filing" checkbox is automatically selected for the first attorney added to a filing. Multiple attorneys can be added to a filing, but only the first attorney added to the filing will be notified of updates.
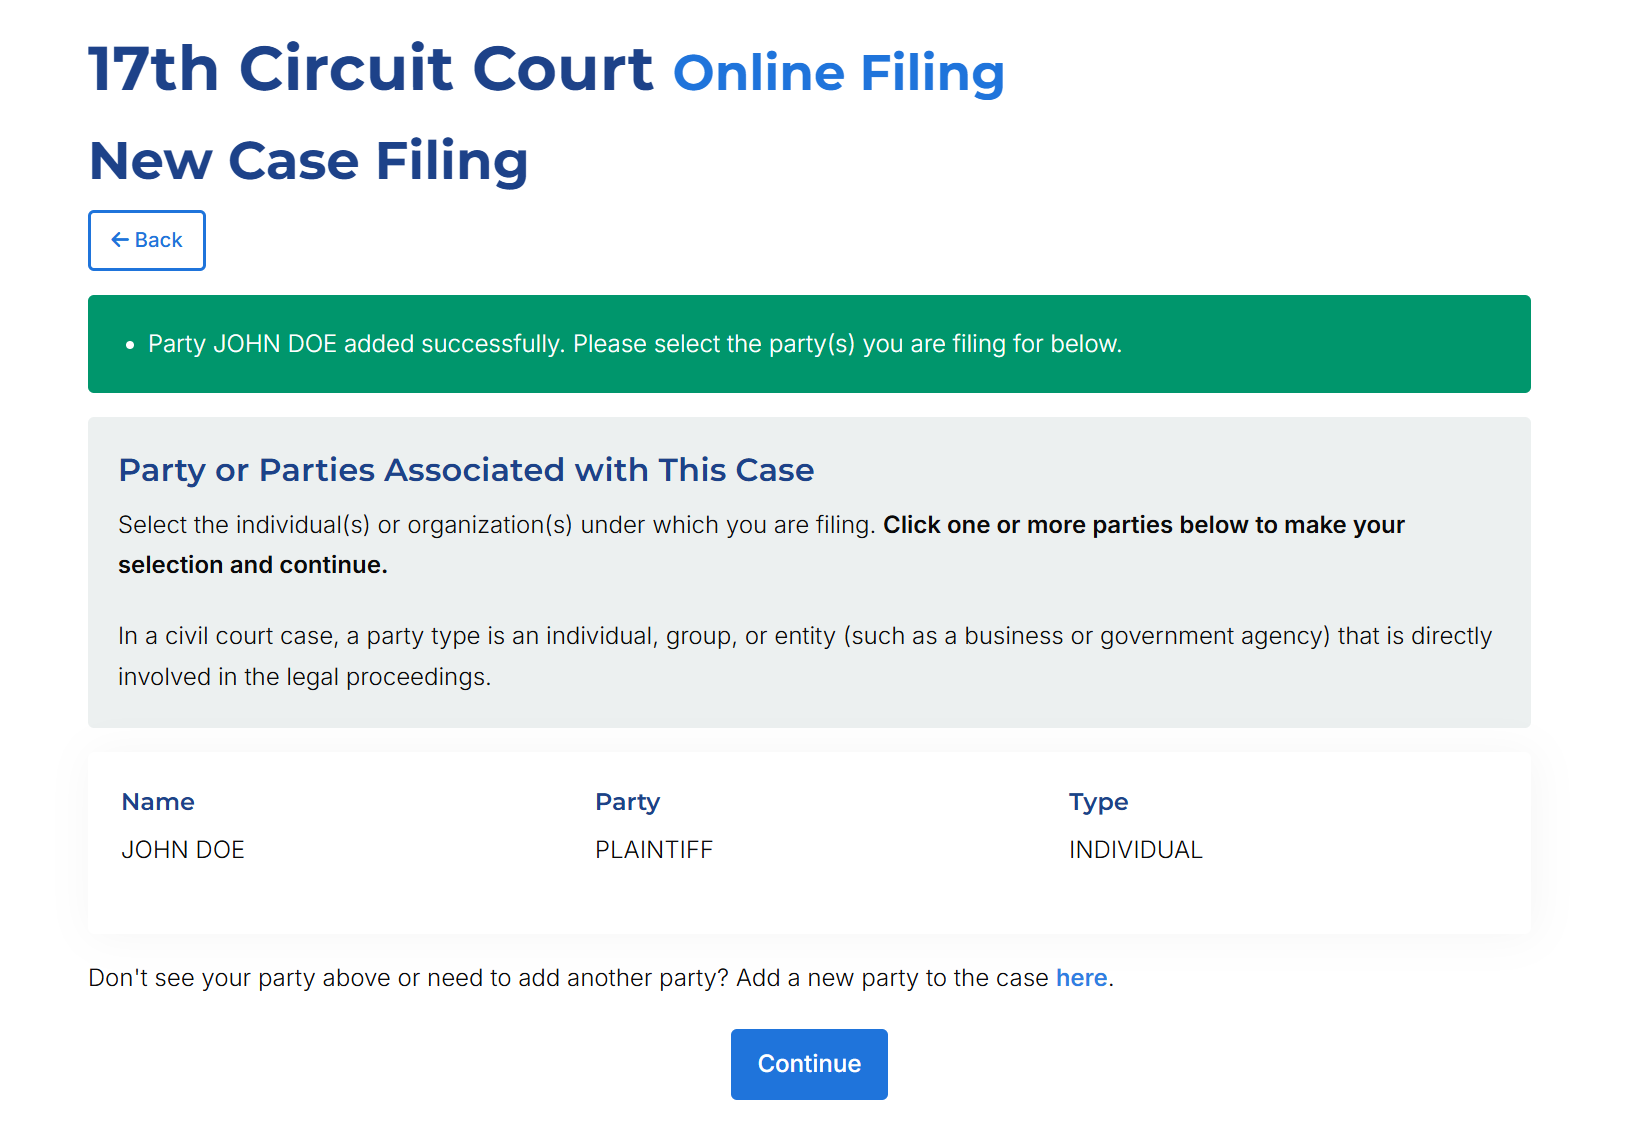
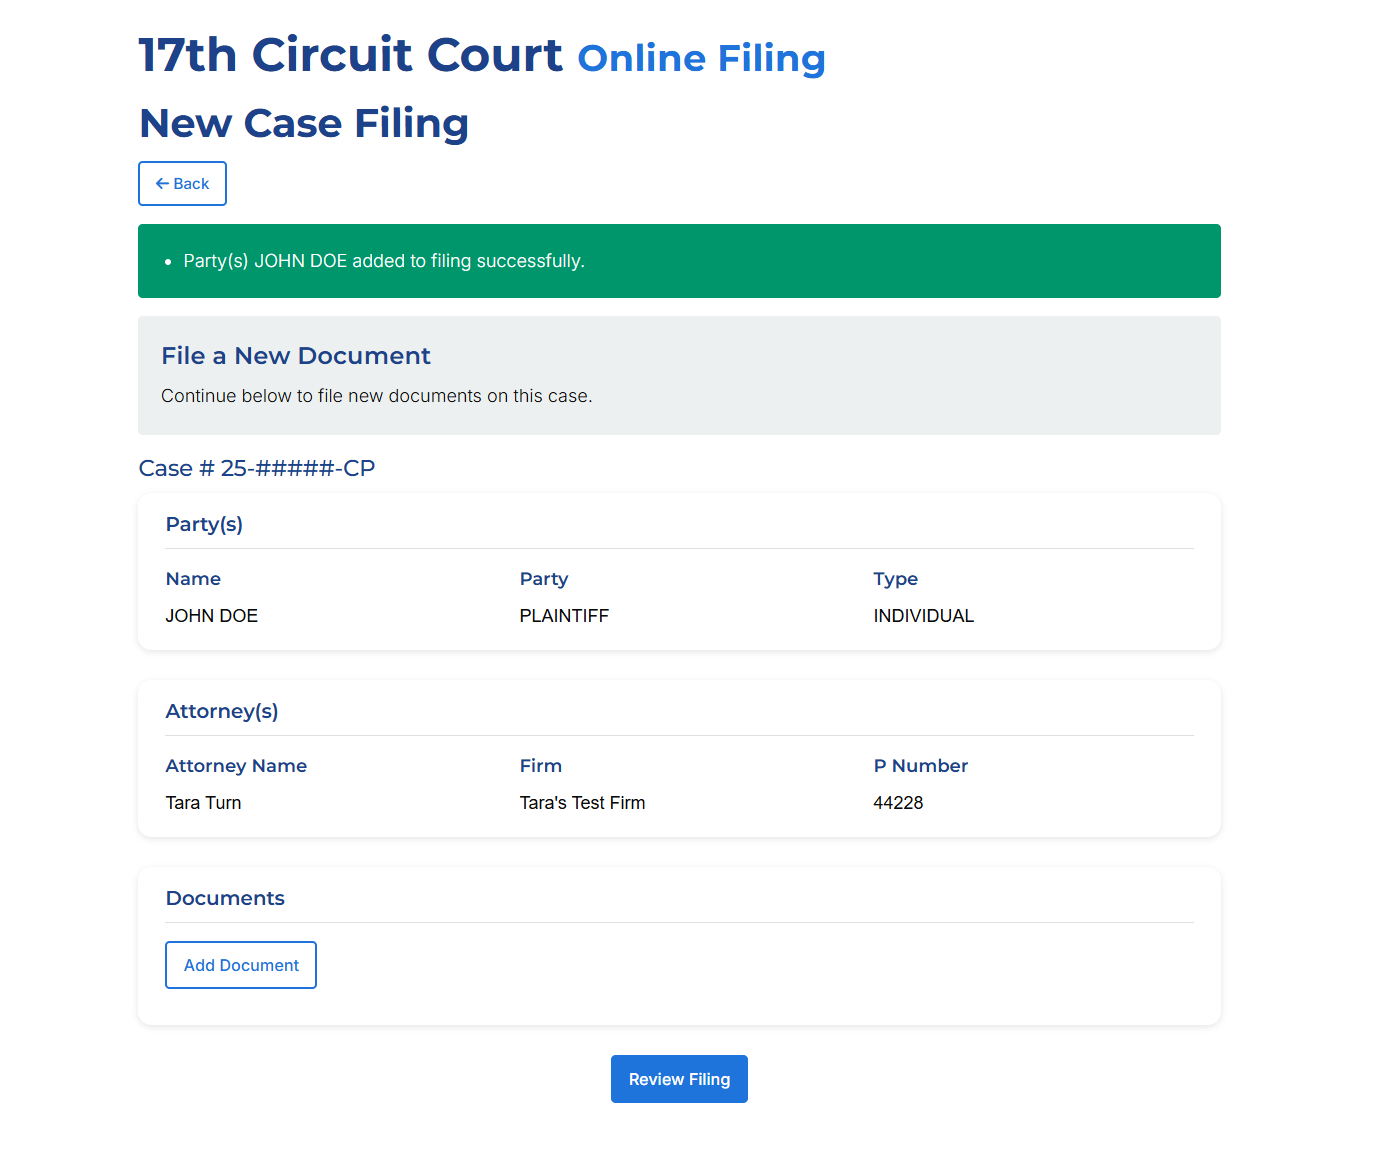
Multiple parties can be added to a single filing. Click on an existing party name to select it. Once the party has been selected or added, click “Continue”.
You will be presented with case, party and attorney information. Confirm that everything looks correct. If you need to make any changes to your filing, click the Back button at the top of the page.
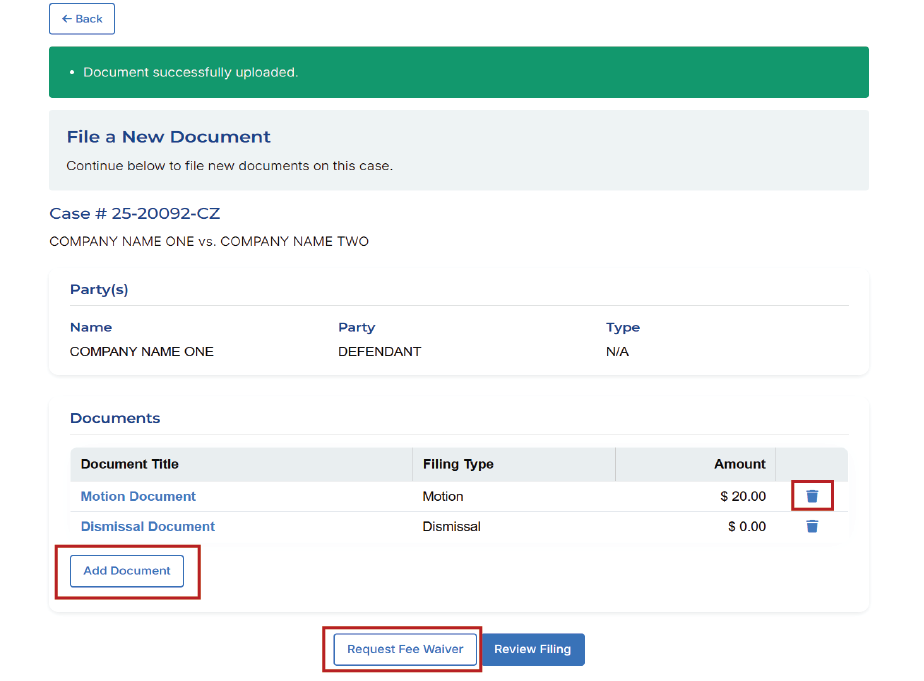
Click “Add Document”; Select document type, add a document name, and choose a document file; Click “Add Document” in order to assign it to the case.
The document will now appear as an attachment on the case. Documents can also be removed from a filing.
A complaint is required to open new cases. No other documents can be filed before the complaint. A motion can be filed for free at the time of filing a complaint. This includes an ex parte motion. The number of motions filed at the time of complaint can exceed one and it will still all be free.
When a document with an associated fee has been added to the filing, the option to add a fee waiver will appear. Click the “Request Fee Waiver” button at the bottom of the page. From here, you can manually enter in the required information or upload your fee waiver document as a PDF file. Click “Submit” when complete to apply the fee waiver to your filing. After a fee waiver has been submitted, you have the ability to review and update it as needed. Once a new filing has been confirmed, no further edits can be made to the fee waiver. A fee waiver needs to be completed each time you file on a case. If your request cannot be approved, the Clerk's Office will contact you with further instructions or alternative options.
Confirm that all case, document, and contact information is correct. Click "Confirm & Checkout" to proceed.
If no fee waiver was completed, you will be redirected to the payment site. Do NOT exit out of your browser until you are redirected back to kentcountymi.gov. Exiting out before you have been redirected back to kentcountymi.gov may cause processing delays. If you are getting an error when adding a card in Safari, please try using a different browser such as Chrome, Firefox, or Edge.
You do NOT need to have an account to check out. You can "continue as guest" located at the bottom of the account selections when our payment provider (PayIt) screen pops up after selecting the "Checkout" button.
If you submitted a fee waiver request, you will be permitted to skip this step and will be immediately presented with your filing receipt.
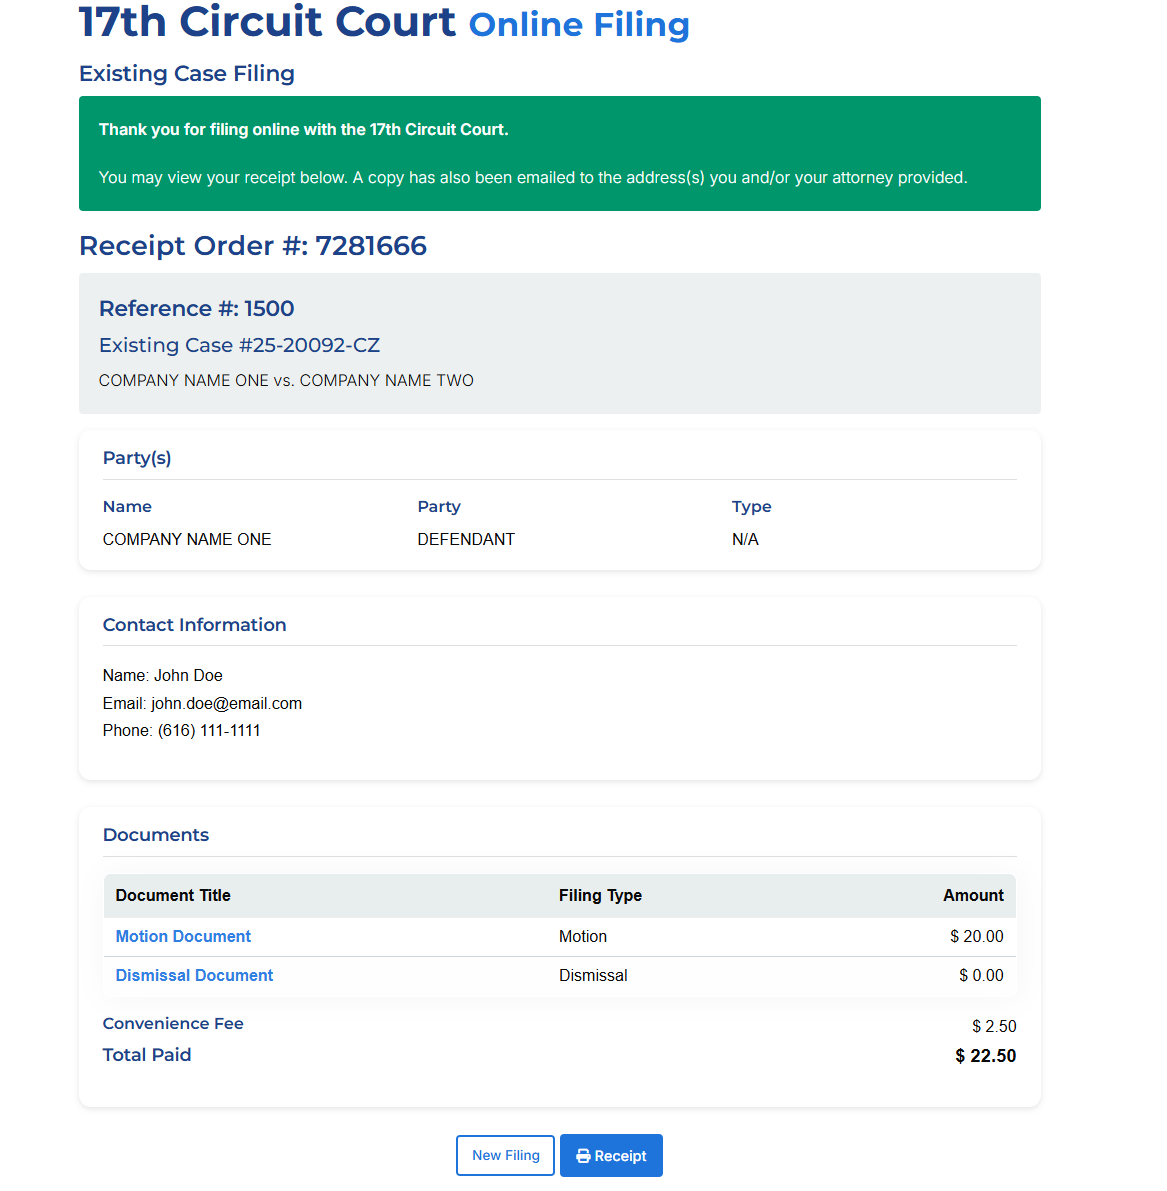
Once payment has been completed, you will be directed back to the eFiling system. Here you can view your order number and print your receipt. There is also the option to start a new filing.
Search for an existing case using a case number. If you do not know your case number, complete a Court Name Search. If no existing case is found in the system, you will be prompted to file a new case or complete another existing case search. You will need to confirm that all information appears correct before continuing in the filing process.
Once a case has been selected, the system will either display a list of parties that are already associated with the case or, if no existing parties are found, will prompt you to add a new party. Click on an existing party name to select it. Once the party has been selected or added, click “Continue”. Multiple parties can be added to a single filing.
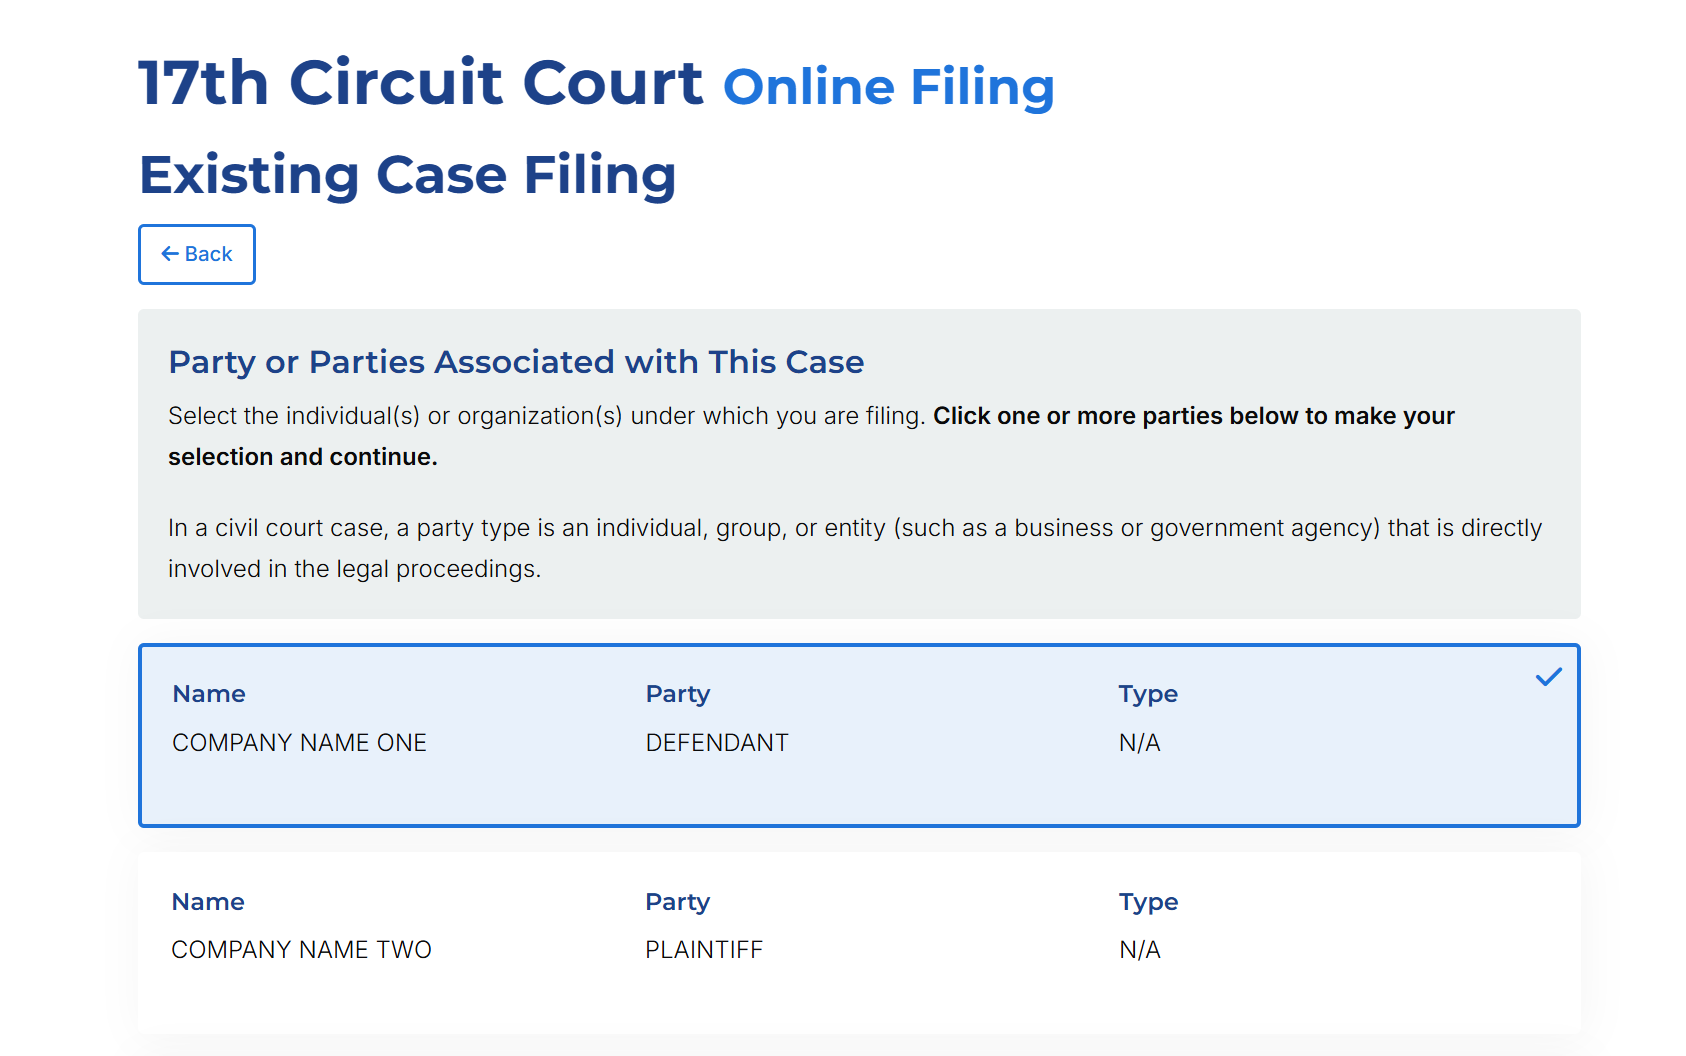
When a new party is added to an existing case, it is automatically listed as a Non-Party. The Court will need to approve before the party can be officially listed on a case.
If representing yourself on a case, you will be prompted to enter in your contact information. You are the person who will be notified regarding your filings.
If an you are an attorney filing on behalf of your client or clients, you can search for yourself in the system using your P Number. If you have filed through the 17th Circuit Court's E-Filing system before, your information will automatically populate. If you have not filed before, you will be prompted to enter your information.
The "Select if you are the attorney making this filing" checkbox is automatically selected for the first attorney added to a filing. Multiple attorneys can be added to a filing, but only the first added will be notified.
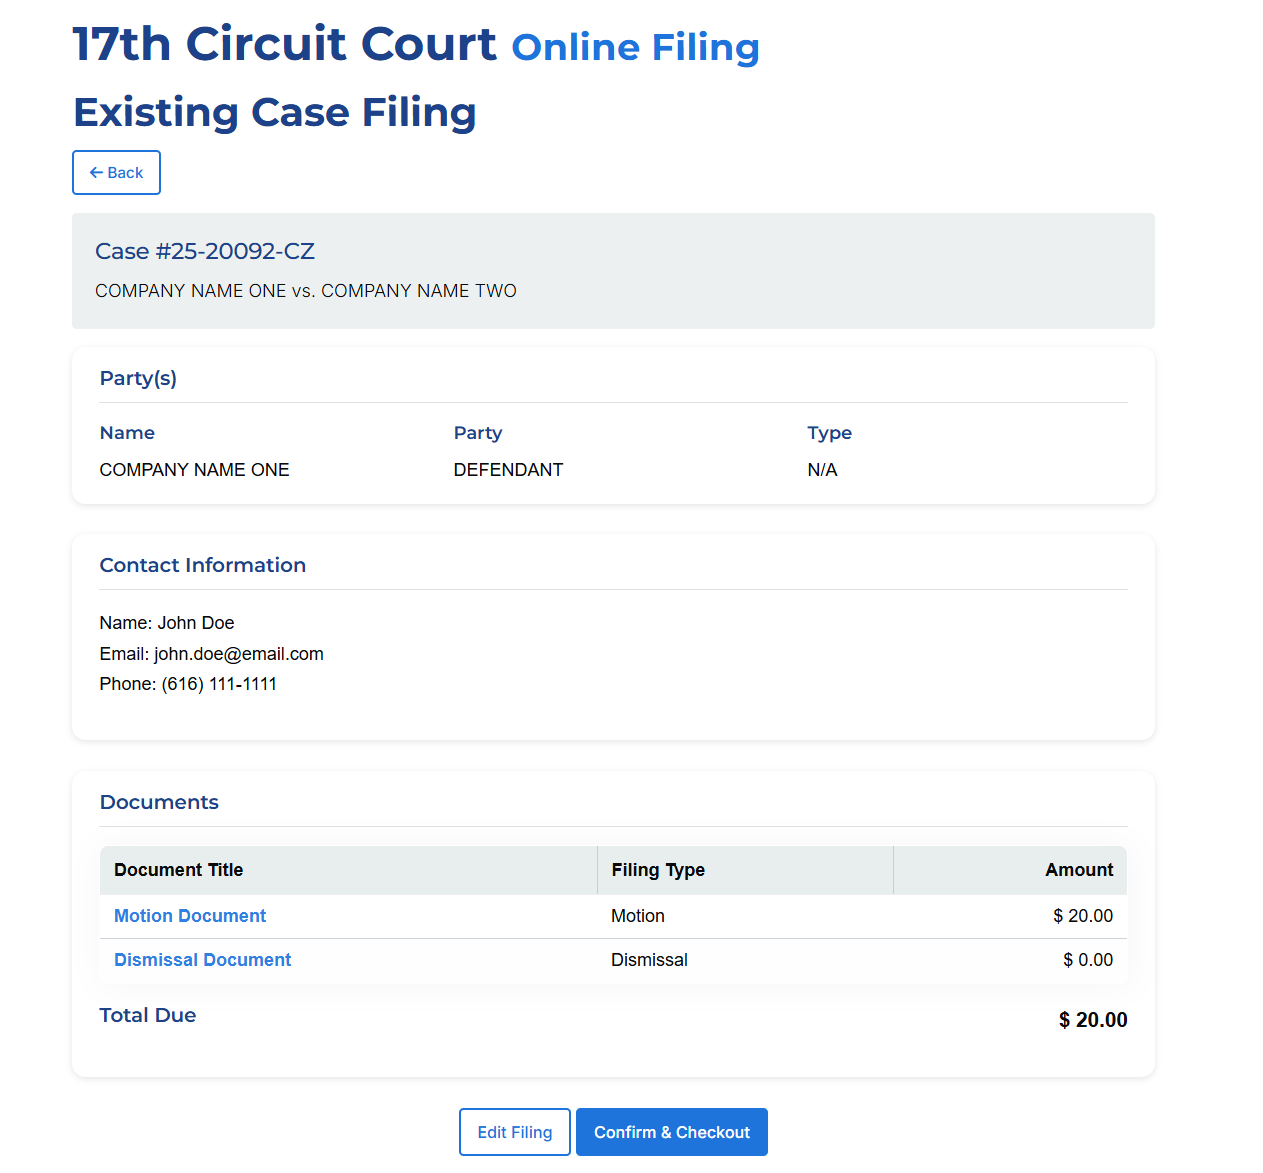
You will be presented with case, party and attorney information. Confirm that everything looks correct.
Click “Add Document”; Select document type, add a document name, and choose a document file; Click “Add Document” in order to assign it to the case.
The document will now appear as an attachment on the case. Documents can also be removed from a filing.
When a document with an associated fee has been added to the filing, the option to add a fee waiver will appear. Click the “Request Fee Waiver” button at the bottom of the page. From here, you can manually enter in the required information or upload your fee waiver document as a PDF file. Click “Submit” when complete to apply the fee waiver to your filing. After a fee waiver has been submitted, you have the ability to review and update it as needed. Once a new filing has been confirmed, no further edits can be made to the fee waiver. A fee waiver needs to be completed each time you file on a case. If your request cannot be approved, the Clerk's Office will contact you with further instructions or alternative options.
Confirm that all case, document, and contact information is correct. Click "Confirm & Checkout" to proceed.
If no fee waiver was completed, you will be redirected to the payment site. Do NOT exit out of your browser until you are redirected back to kentcountymi.gov. Exiting out before you have been redirected back to kentcountymi.gov may cause processing delays. If you are getting an error when adding a card in Safari, please try using a different browser such as Chrome, Firefox, or Edge.
You do NOT need to have an account to check out. You can "continue as guest" located at the bottom of the account selections when our payment provider (PayIt) screen pops up after selecting the "Checkout" button.
If you submitted a fee waiver request, you will be permitted to skip this step and will be immediately presented with your filing receipt.
Once payment has been completed, you will be directed back to the eFiling system. Here you can view your order number and print your receipt. There is also the option to start a new filing.